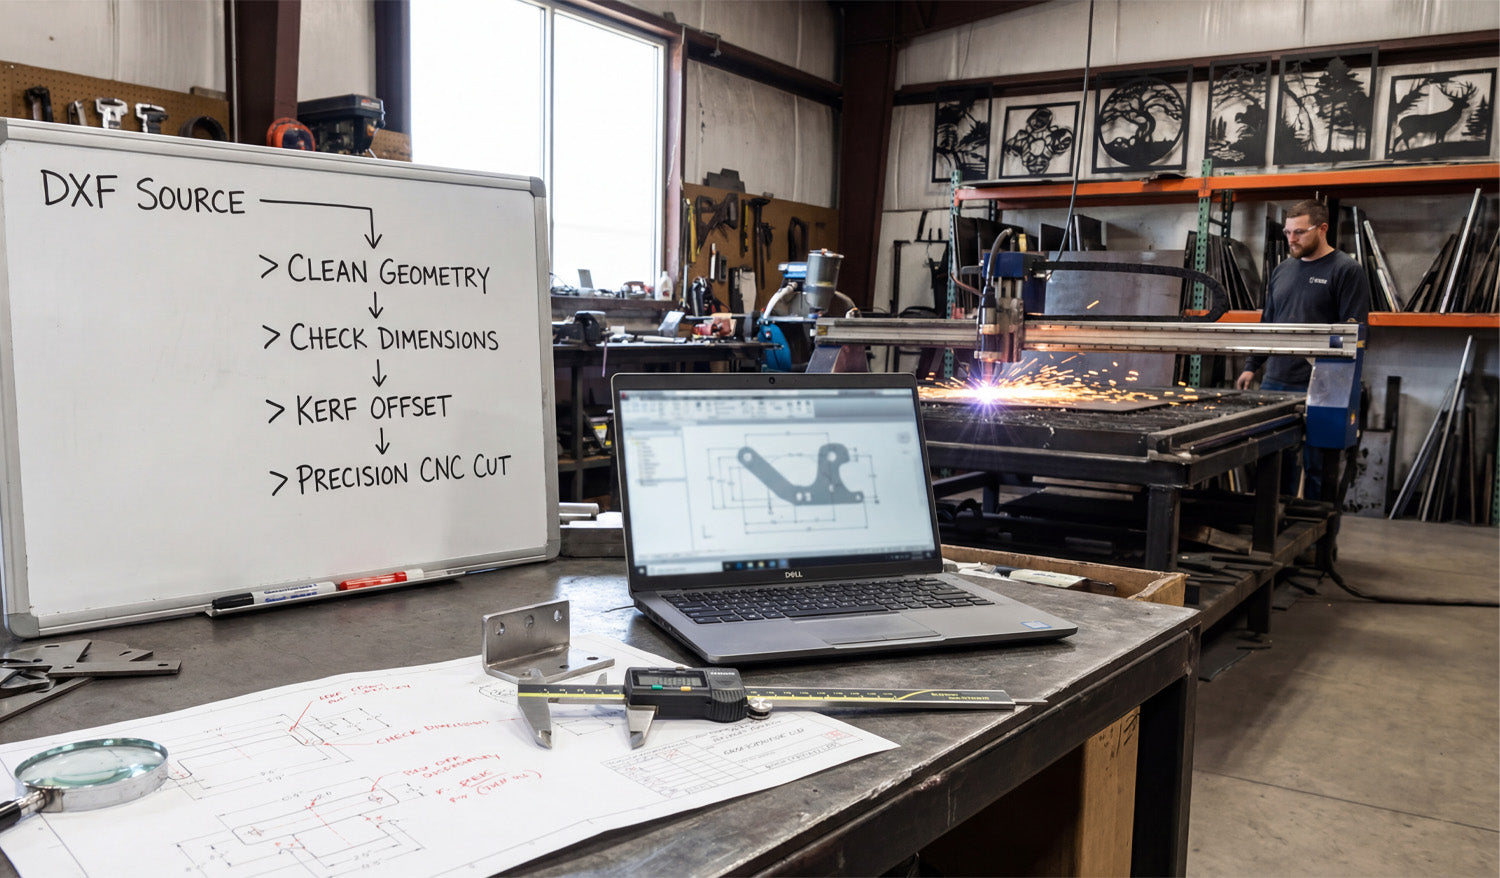
Editing DXF files for maximum precision in CNC projects is about turning “good-looking” drawings into mathematically exact geometry with correct units, clean constraints, and features that match how your tools and materials behave in the real world.
Why DXF Editing Matters More Than You Think
Many DXF files look fine on screen but fall apart at the machine:
- Holes that are slightly off-center or the wrong size.
- Profiles that are almost closed but contain tiny gaps.
- Traced curves that look smooth but are actually made of random segments.
If you want tight fits, repeatable parts, and fewer surprises, you have to treat DXF editing as a precision step, not just a quick cleanup before CAM.
1. Confirm Units, Scale, and Origin First
Precision starts with numbers that actually mean what you think they mean.
- Set units: Make sure your DXF is in millimeters or inches and your CAD/CAM software is using the same unit system.
- Check a known dimension: Measure a feature that should be a standard value (like a 50 mm plate or a 2" circle) to confirm scale.
- Define a logical origin: Move the part so a meaningful point (corner, center, or mounting hole) sits at (0,0) when possible.
When units and origin are correct, every coordinate, dimension, and toolpath becomes easier to interpret and verify.
2. Turn Rough Geometry into Exact Lines and Arcs
Many DXF files are born from image traces or low-quality exports. They look smooth, but the geometry underneath is messy.
- Replace polyline “circles” with true circles: Use fit or convert tools to turn faceted holes into real circular entities.
- Use arcs instead of many tiny segments: Where possible, refit curves as arcs for cleaner toolpaths and more accurate radii.
- Lock down key angles and lengths: Edit lines so they are exactly horizontal/vertical or exactly at 30°, 45°, etc., not 44.98°.
Exact geometry makes kerf compensation and dimension checks trustworthy instead of approximate.
3. Close All Profiles and Remove Micro Gaps
Open contours are one of the most common sources of CNC issues. CAM may skip them, misinterpret them, or require extra manual fixing.
- Use “extend” and “trim” tools to make lines meet precisely at endpoints.
- Zoom in aggressively: Small gaps can hide at corners and intersections, especially after scaling.
- Use “join” or “polyline edit” tools to combine segments into single closed loops.
Every profile you send to CAM should be a clean, closed path with no overlaps or tiny breaks.
4. Add Constraints and Dimensions in CAD, Not at the Machine
To achieve maximum precision, do not rely on “eyeballing” geometry or editing dimensions in CAM only.
- Apply geometric constraints: Make lines parallel, perpendicular, concentric, or tangent where appropriate.
- Use driven dimensions: Add dimensions in CAD that show critical distances and compare them against your design requirements.
- Adjust geometry via dimensions: For critical fits, type exact numbers instead of dragging endpoints with the mouse.
Once your constrained sketch matches your intended dimensions exactly, export the DXF as your “precision truth” for CAM.
5. Size Holes, Slots, and Tabs for Real CNC Kerf
DXF precision is not only math on screen—it has to account for the physical reality of your tool or beam.
- Compensate for kerf: If you know your laser or plasma cuts undersized holes, oversize the DXF hole diameter slightly.
- Design clearance into slots and tabs: For press-fit or slip-fit joints, adjust sizes by known clearance values (for example, +0.1 mm, +0.2 mm) based on real test cuts.
- Standardize feature sizes: Use consistent hole and slot dimensions that match your most common tools and fasteners.
By editing the DXF to match how your machine actually cuts, you get accurate fit without constant manual tweaking at the CAM stage.
6. Align Features to a Common Datum
Precision CNC work often depends on a clear reference, or datum, that all critical features relate to.
- Choose a primary datum: For example, the bottom-left corner or centerline of the part.
- Snap key features to that datum: Align bolt circles, pockets, and slots relative to that reference, not to random edges.
- Maintain symmetry: If the part should be symmetrical, edit the DXF so features mirror perfectly across the centerline.
Awell-defined datum structure makes alignment, fixturing, and inspection far more consistent.
7. Clean Up Imported or Customer-Supplied DXF Files
When customers send you “finished” DXF files, they often are not as finished as they think. Precision editing is your job.
- Check for overlapping geometry: Remove double lines and stacked entities that can cause double cuts.
- Normalize layers: Move important features onto your standard set of layers (profiles, holes, engrave, reference).
- Fix bad offsets: Correct poorly offset curves that create uneven wall thickness or inconsistent edge spacing.
After cleanup, save a revised version clearly labeled as your production-ready DXF for that project.
8. Use Snaps and Grids Instead of Freehand Editing
Precision and freehand mouse movements do not mix. Snap tools exist to keep your edits mathematically exact.
- Turn on endpoint, midpoint, center, and intersection snaps when editing.
- Use a grid or construction lines for aligning holes, slots, and cutouts.
- Avoid dragging entities without snaps unless you are intentionally making a non-critical visual change.
Snaps and grids ensure that every edit lands exactly where it belongs, not a few tenths of a millimeter off.
9. Compare the Edited DXF Against a Reference Drawing
For high-precision jobs with formal drawings, don’t trust memory—verify.
- Keep the original 2D drawing (PDF or CAD) open alongside your DXF.
- Check all critical dimensions: hole positions, slot widths, part size, and key offsets.
- Use dimension tools to confirm that your edited DXF still matches the official print.
If there is a mismatch, either fix the DXF or request a clarified drawing before cutting expensive material.
10. Save and Document “Production-Grade” DXF Versions
Once a DXF has been edited and proven accurate on the machine, lock it in as a trusted version.
- Use a clear naming scheme, for example:
partname_precise_R2.dxforpartname_prod_R3.dxf. - Store the DXF together with test notes: material, thickness, machine, and any special offsets used.
- Avoid casual edits to the production file; make changes as a new revision instead.
Over time, you build a small library of “known good” precision DXF files that you can run again with confidence.
Quick Precision Editing Checklist
Before sending a DXF file to CAM for a critical CNC job, ask:
- ✔ Are units, scale, and origin correct?
- ✔ Are key lines and arcs exact, not almost straight or almost round?
- ✔ Are all profiles fully closed and free of duplicates?
- ✔ Are holes, slots, and tabs sized for real-world kerf and fit?
- ✔ Are features aligned to a clear datum and symmetry where required?
- ✔ Has the DXF been checked against a drawing or reference dimensions?
- ✔ Is this version labeled and saved as the production-grade file?
Conclusion
Editing DXF files for maximum precision in CNC projects is about moving from “looks right” to “is right.” By correcting units, refining geometry, closing gaps, aligning features to datums, and sizing everything for real tools and kerf, you turn DXF files into reliable blueprints that your CNC machines can follow with tight tolerances and repeatable accuracy.


