Optimizing your DXF files is one of the easiest ways to speed up your CNC cutting, reduce cycle times, and get more parts done without buying a new machine.
Why Optimized DXF Files Make CNC Cutting Faster
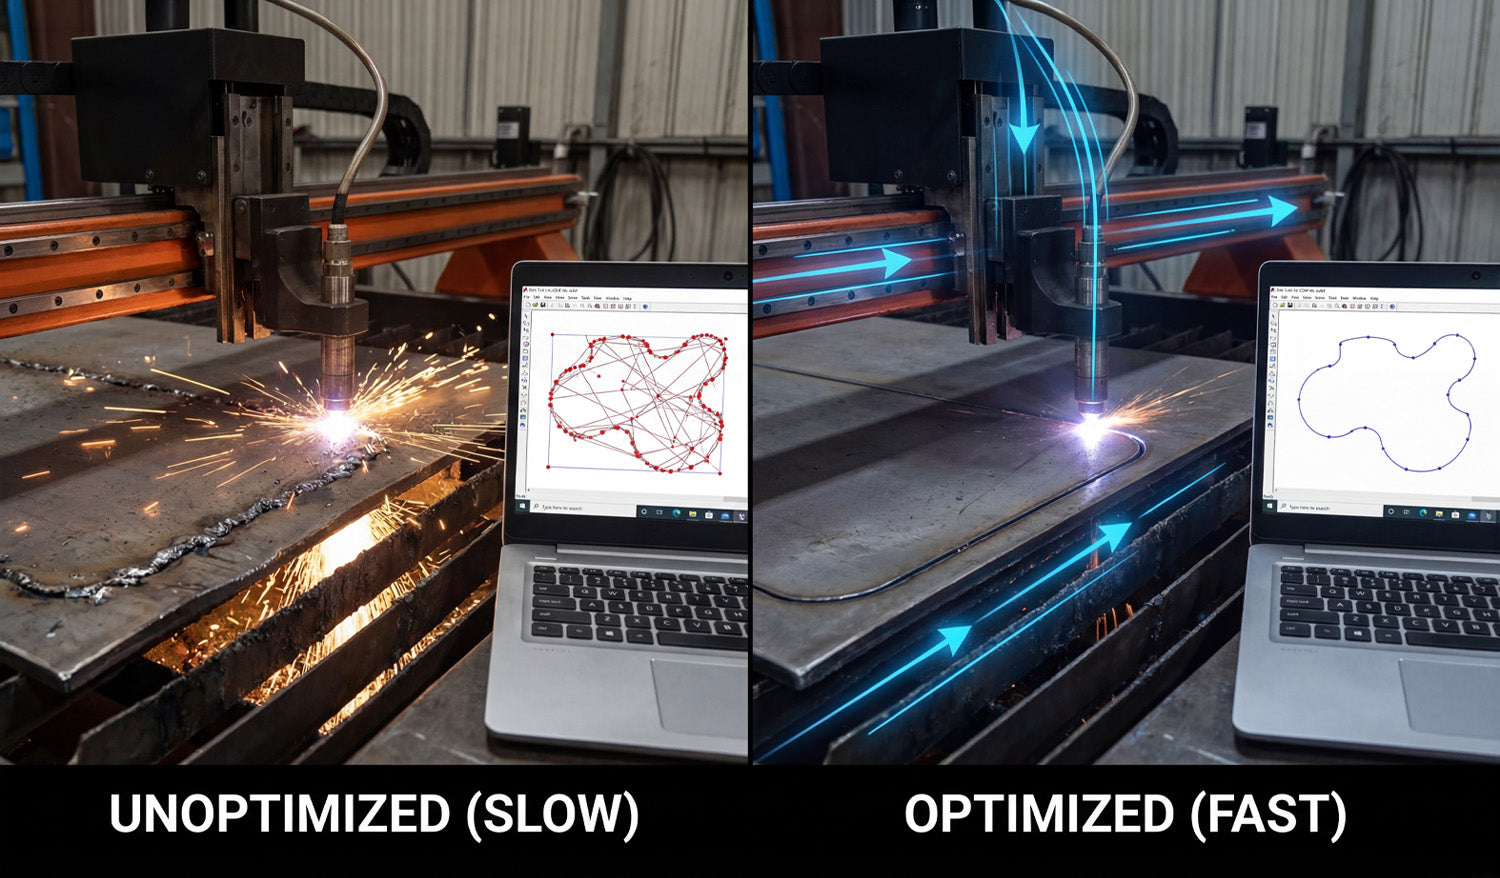
Most people think faster CNC cutting means turning up speed or power. In reality, your DXF file has just as much impact. Every extra node, duplicate line, and unnecessary pierce adds time to the job. A clean, optimized DXF file helps your laser, plasma, router, or water-jet move smoothly and efficiently.
By improving the geometry before you generate toolpaths, you can:
- Shorten total cutting time per sheet or part.
- Reduce pierce counts and direction changes.
- Get smoother motion and better edge quality at higher speeds.
- Fit more parts into each nesting layout.
1. Remove Duplicate and Overlapping Geometry
Duplicate lines are one of the biggest hidden time-wasters in CNC cutting. If two lines sit on top of each other, the machine will often cut the same path twice.
- Use “delete duplicates” tools in your CAD software if available.
- Zoom in on corners and tight areas to look for stacked borders or overlapping outlines.
- Keep one clean outline for each contour and delete the rest.
Fewer unnecessary tool passes mean less heat, less wear on consumables, and faster jobs.
2. Close Open Paths and Fix Gaps
Open paths slow down your CAM workflow and can force you into manual fixes that eat up time.
- Turn on endpoint snaps and join dangling line ends.
- Use “close path” or “join” commands to create true closed loops.
- Replace messy corners with fresh lines or arcs if the gap is hard to repair cleanly.
When all profiles are closed, your CAM software can assign inside and outside cuts automatically, speeding up setup and reducing errors.
3. Reduce Excessive Nodes for Smoother Motion
Highly detailed curves made from thousands of tiny segments cause the machine to constantly slow down and speed up. That kills cutting speed and edge quality.
- Use a simplify or optimize curve function to reduce node count.
- Keep enough points to preserve the shape, but remove micro segments that add no real detail.
- Convert “stair-stepped” curves from traced images into smooth arcs or splines when possible.
Smoother geometry lets the CNC machine maintain consistent velocity and handle higher feed rates with less vibration.
4. Design Continuous Contours to Cut More in One Pass
Every time the cutting head lifts, retracts, and moves to a new start point, you lose time. Optimized DXF files minimize these non-cutting moves by using continuous contours where possible.
- Combine small segments into single polylines instead of separate objects.
- When appropriate, connect adjacent shapes with small bridges or shared lines to reduce pierces.
- For patterns and panels, consider common-line cutting where two parts share a cut, if your process and tolerances allow it.
Fewer pierces and longer continuous cuts significantly reduce cycle time on both laser and plasma systems.
5. Simplify Detail to Match Your Machine and Material
Sometimes the fastest way to speed up CNC cutting is to remove detail that the machine cannot cut efficiently anyway.
- Eliminate micro details that are smaller than your kerf or tool diameter.
- Thicken fragile bridges and thin lines that slow the machine or burn away.
- Replace dense textures or tiny cutouts with cleaner, bolder shapes that still look good.
Well-optimized DXF artwork keeps the visual impact but cuts faster, more reliably, and with fewer rejects.
6. Use Layers to Streamline Operations
DXF files support layers (and often colors), which you can use to control how your CAM software processes the job.
- Put inside cuts on one layer and outside profiles on another.
- Separate engraving, marking, or scoring from full-depth cuts.
- Use a reference layer for dimensions and notes that should never be cut.
When you import an organized DXF, you can map entire layers to specific speeds, powers, and cut orders in just a few clicks, shortening setup time for every job.
7. Optimize Part Layout and Nesting in the DXF Stage
Nesting is usually handled in CAM or nesting software, but your DXF design choices can make nesting faster and more efficient.
- Design parts with simple, nest-friendly outer profiles that pack well together.
- Avoid large, awkward outlines when a more compact shape would work just as well.
- Consider using tab locations that allow parts to share edges or nest tightly.
Better nest layouts mean less head travel, fewer pierces, less scrap, and shorter total cut times per sheet.
8. Create Machine-Specific DXF Variants
If you run multiple CNC machines (laser, plasma, router), a single DXF may not be ideal for all of them. Creating machine-specific variants helps you run each job at top speed.
- For laser, keep fine detail but clean up tiny gaps and islands that slow motion.
- For plasma, remove very fine details that the kerf cannot hold and widen narrow bridges.
- For router, adjust inside corners and pockets for the bit diameter, and remove unnecessary small features.
Saving tuned versions (for example, design_laser.dxf, design_plasma.dxf) lets each machine cut faster without compromising quality.
9. Standardize Lead-Ins, Tabs, and Cut Order
While lead-ins, tabs, and cut order are usually set in CAM software, your DXF preparation can support those decisions.
- Keep outlines clean and well separated so CAM can place lead-ins automatically in safe areas.
- Avoid overlapping contours that confuse inside/outside detection and slow you down during setup.
- Design parts so inner features are clearly recognized, making it easy to cut them before the outer profile.
A DXF file that works with, not against, your CAM rules makes every job quicker to program and safer to run at higher speeds.
10. Build and Reuse a Library of Proven, Optimized DXF Files
The biggest time savings come when you can reuse designs that are already optimized and tested.
- Save cleaned, optimized DXF files as “final” or “production-ready” versions.
- Store notes on best cutting speeds and settings alongside each design.
- Organize your library so you can quickly find and repeat jobs that you know cut fast and clean.
Over time, your optimized DXF library becomes a real asset: every time you reuse a design, you benefit again from the time you spent optimizing it once.
Quick Checklist: Is Your DXF Optimized for Speed?
Before you send a job to your CNC machine, run through this fast checklist:
- All shapes are closed, with no gaps.
- No duplicate lines or overlapping outlines.
- Curves have a reasonable node count and are smooth.
- Detail level matches kerf and material strength.
- Layers clearly separate cut types and operations.
- Part outlines are nest-friendly for your sheet size.
- Machine-specific needs (laser, plasma, router) are considered.
Conclusion
Speeding up your CNC cutting is not just about pushing the machine harder—it starts with optimized DXF files. By cleaning geometry, reducing nodes, designing continuous contours, matching detail to your process, organizing layers, and building a library of proven designs, you can cut faster and smarter on any CNC system. The result is shorter cycle times, less wear on equipment, and more profitable jobs from the same machines you already own.


