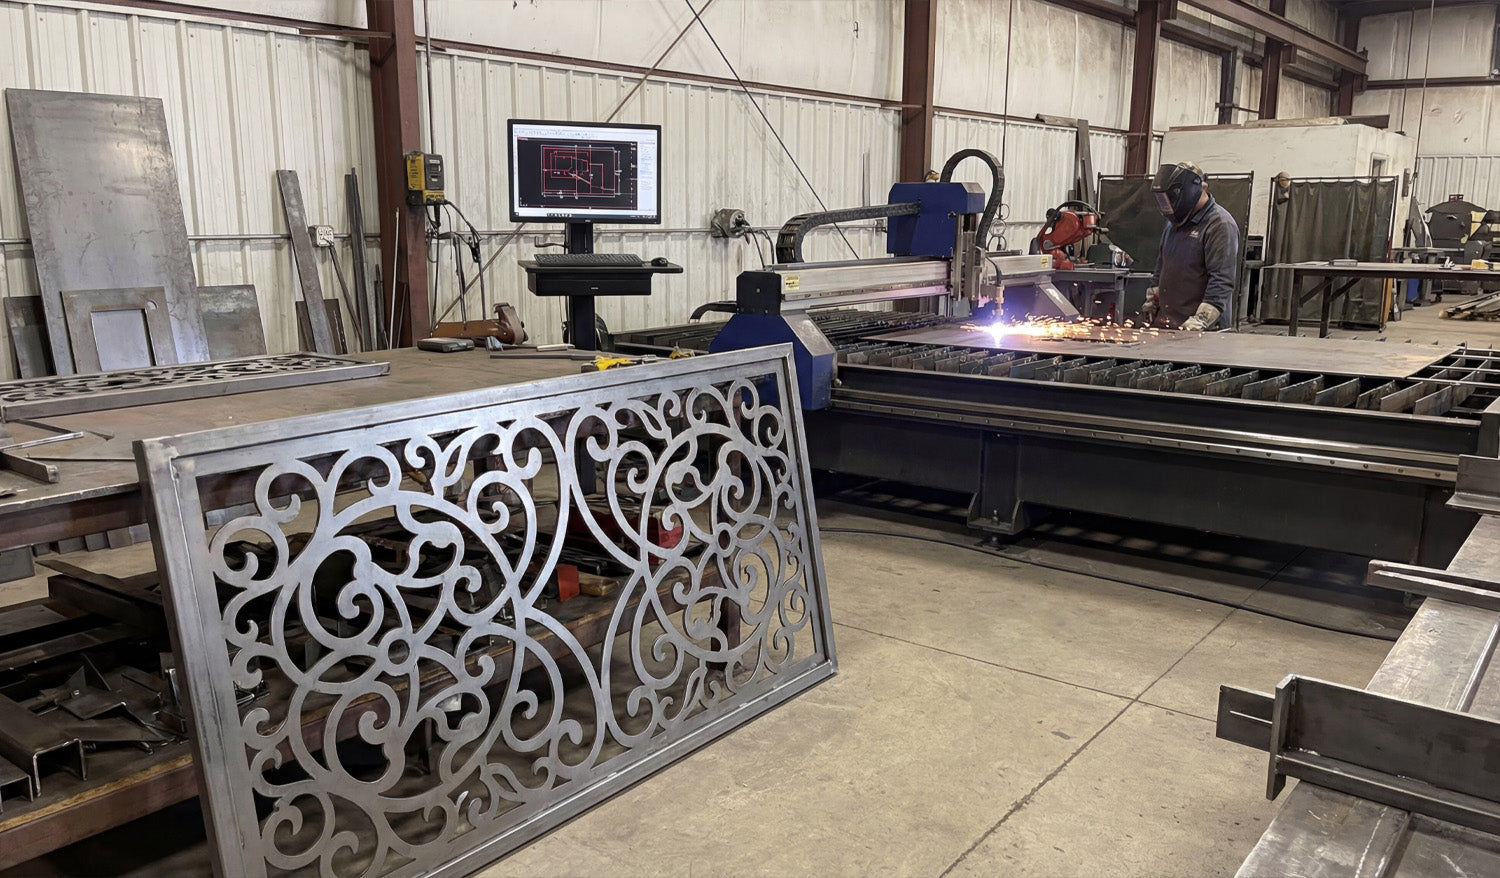
Using DXF files for efficient CNC cutting of complex shapes is all about combining clean vector design, smart nesting, and machine-aware toolpaths so your laser, plasma, router, or mill can handle detailed parts without wasting time or material.
Why DXF Files Are Ideal for Complex CNC Shapes
DXF (Drawing Exchange Format) files store geometry as vectors—lines, arcs, and curves—rather than pixels. This makes them perfect for complex CNC cutting because:
- Curves and contours remain smooth at any size.
- Toolpaths can follow precise edges instead of “guessing” from a bitmap.
- Layers and colors can represent different operations (cut, engrave, score).
- Almost every CAD, CAM, and CNC controller can import DXF files.
When your DXF files are prepared correctly, even very intricate patterns can be cut reliably and repeatedly across different machines and materials.
Step 1: Design Complex Shapes with CNC in Mind
Efficient cutting begins at the design stage. If you know a shape will be used for CNC cutting, design it with real-world constraints from the start.
- Define the purpose: Is it decorative art, structural, a sign, or a functional part in an assembly?
- Choose the machine: Laser, plasma, router, or mill—each has different minimum feature sizes and kerf.
- Pick the material: Steel, aluminum, wood, acrylic, MDF, etc., all respond differently to complex cuts.
By setting these parameters early, you can avoid over-detailing areas that your machine or material cannot handle efficiently.
Step 2: Keep Geometry Clean and Connected
Complex shapes often involve many curves, cutouts, and internal details. Clean geometry is critical for efficiency.
- Close all contours: Ensure every outer profile and inner cutout is a closed loop—no tiny gaps.
- Remove duplicates: Delete overlapping lines and arcs that can cause double cuts.
- Eliminate stray elements: Clean out tiny fragments, construction lines, and unused blocks.
- Join related segments: Convert small segments into continuous polylines wherever possible.
Clean DXF geometry reduces toolpath calculation time and prevents weird behavior on the CNC machine, especially around complex details.
Step 3: Optimize Node Count on Curves and Contours
Complex shapes tend to accumulate a lot of nodes (control points), especially if they are traced from images. Too many nodes slow down CAM and create choppy motion.
- Use your CAD or vector software’s simplify or optimize curve tools.
- Set simplification tolerances so the visual shape stays accurate but uses fewer points.
- Convert “stair-stepped” outlines from tracing into smoother arcs and splines.
- Focus on dense areas: decorative borders, filigree, and fine patterns.
Optimizing node count helps your CNC machine follow complex paths smoothly and efficiently without changing the overall look.
Step 4: Use Layers to Separate Complex Operations
Complex DXF designs often combine different operations: through cuts, engraving, scoring, and reference geometry. Layers keep this under control.
- Create layers for CUT_OUTSIDE, CUT_INSIDE, ENGRAVE, SCORE, and REF.
- Place each element of the complex shape on the correct layer as you design.
- Assign distinct colors per layer if your CAM or controller maps colors to settings.
- Put dimensions and construction marks on a reference layer that will never be cut.
Layered DXF files let you quickly assign power, speed, and depth settings to different parts of a complex design in just a few clicks.
Step 5: Match Detail Level to Machine and Material
Not every detail that looks great on-screen will cut cleanly or efficiently on your machine. For complex shapes, it is vital to align detail with reality.
- Laser: Can handle very fine detail, but avoid micro features that are smaller than the kerf or cause weak bridges.
- Plasma: Needs stronger, thicker details. Remove tiny islands and thin webs that will warp or blow out.
- Router: Limited by tool diameter; internal corners need radii or dogbones to be cut accurately.
- Mill: Complex contours may require multiple tools and passes; avoid impossible-to-reach recesses in 2D contour work.
For efficient cutting, simplify any detail that your process cannot reliably reproduce or that dramatically slows the job without adding real value.
Step 6: Plan Kerf, Bridges, and Minimum Features
Complex shapes look impressive, but they must survive cutting and handling. Design your DXF with kerf and minimum feature sizes in mind.
- Know your kerf width for each process and material.
- Ensure bridges and thin webs are wider than the kerf and strong enough after cutting.
- Set minimum feature sizes (gap width, hole diameter, text thickness) for each machine type.
- Adjust critical fit features (tabs, slots, joints) for expected kerf compensation.
Kerf-aware DXF designs let your complex shapes stay strong and functional instead of falling apart at the table.
Step 7: Nest Complex Shapes for Efficient Material Use
When cutting multiple complex shapes from sheet material, nesting is key to efficiency.
- Arrange shapes to maximize material usage and minimize scrap.
- Rotate and mirror parts where allowed to fit them more tightly together.
- Maintain safe spacing between complex contours to avoid heat buildup or collisions.
- Group similar shapes or mirrored pairs to simplify cutting order.
A well-nested DXF layout for complex shapes can significantly reduce material cost and cutting time, especially on larger jobs.
Step 8: Assign Smart Lead-Ins, Lead-Outs, and Cut Order
Complex shapes often have many internal cutouts, spikes, and tight curves. Toolpath strategy matters as much as the geometry.
- Use lead-ins and lead-outs away from critical edges to avoid visible marks.
- Cut internal features first (holes, slots, inner details), then outer profiles last.
- For thin materials or small complex parts, consider tabs to keep parts from tipping or moving.
- Optimize cut order to minimize rapid moves and reduce the chance of heat distortion.
Good toolpath planning turns a complex DXF drawing into a smooth, efficient CNC job instead of a chaotic cut sequence.
Step 9: Simulate Before Cutting Complex DXF Jobs
Simulation is especially important when shapes are intricate and toolpaths are dense.
- Simulate the full cut path in your CAM software.
- Watch for unexpected jumps, collisions, or strange tool behavior.
- Check that inside/outside compensation is correct for all contours.
- Review estimated cut time and see if any areas are over-detailed for the result you need.
A few minutes of simulation can save sheets of material and hours of troubleshooting on complex CNC jobs.
Step 10: Test on Scrap and Refine the DXF
Even with a great DXF and well-planned toolpaths, complex shapes almost always benefit from one test run.
- Cut a small section or downsized version of the design on scrap material.
- Check edge quality, sharpness of detail, and strength of thin areas.
- Adjust power, speed, and kerf compensation as needed.
- Refine the DXF by thickening weak features or simplifying overly dense detail.
Use what you learn from test cuts to improve both the design and the process. Save updated versions of your DXF with clear version numbers.
Quick Checklist for Efficient CNC Cutting of Complex DXF Shapes
Before running a complex DXF job, make sure:
- ✔ Units and scale are correct and verified with a known dimension.
- ✔ Geometry is clean: no gaps, duplicates, or stray entities.
- ✔ Node count on curves is optimized for smooth motion.
- ✔ Layers clearly separate different operations (cut, engrave, score, reference).
- ✔ Detail level matches your machine’s kerf and minimum feature size.
- ✔ Nesting is efficient and respects safe spacing.
- ✔ Toolpaths use smart lead-ins, lead-outs, and cut order.
- ✔ Simulation and at least one test cut have been completed.
Conclusion
Using DXF files for efficient CNC cutting of complex shapes is not just about having powerful machines; it is about feeding those machines smart, clean, and well-organized designs. By cleaning geometry, optimizing curves, using layers, planning kerf and feature sizes, nesting strategically, and testing before production, you can cut even very intricate patterns with confidence. Do this consistently, and your DXF workflow will turn complex shapes into reliable, profitable CNC projects on every job.


