Using DXF files for complex CNC milling projects gives you a clean way to define profiles, pockets, and critical 2D geometry so your CAM software can generate accurate toolpaths for multi-step, multi-setup machining.
How DXF Files Fit into Complex CNC Milling Work
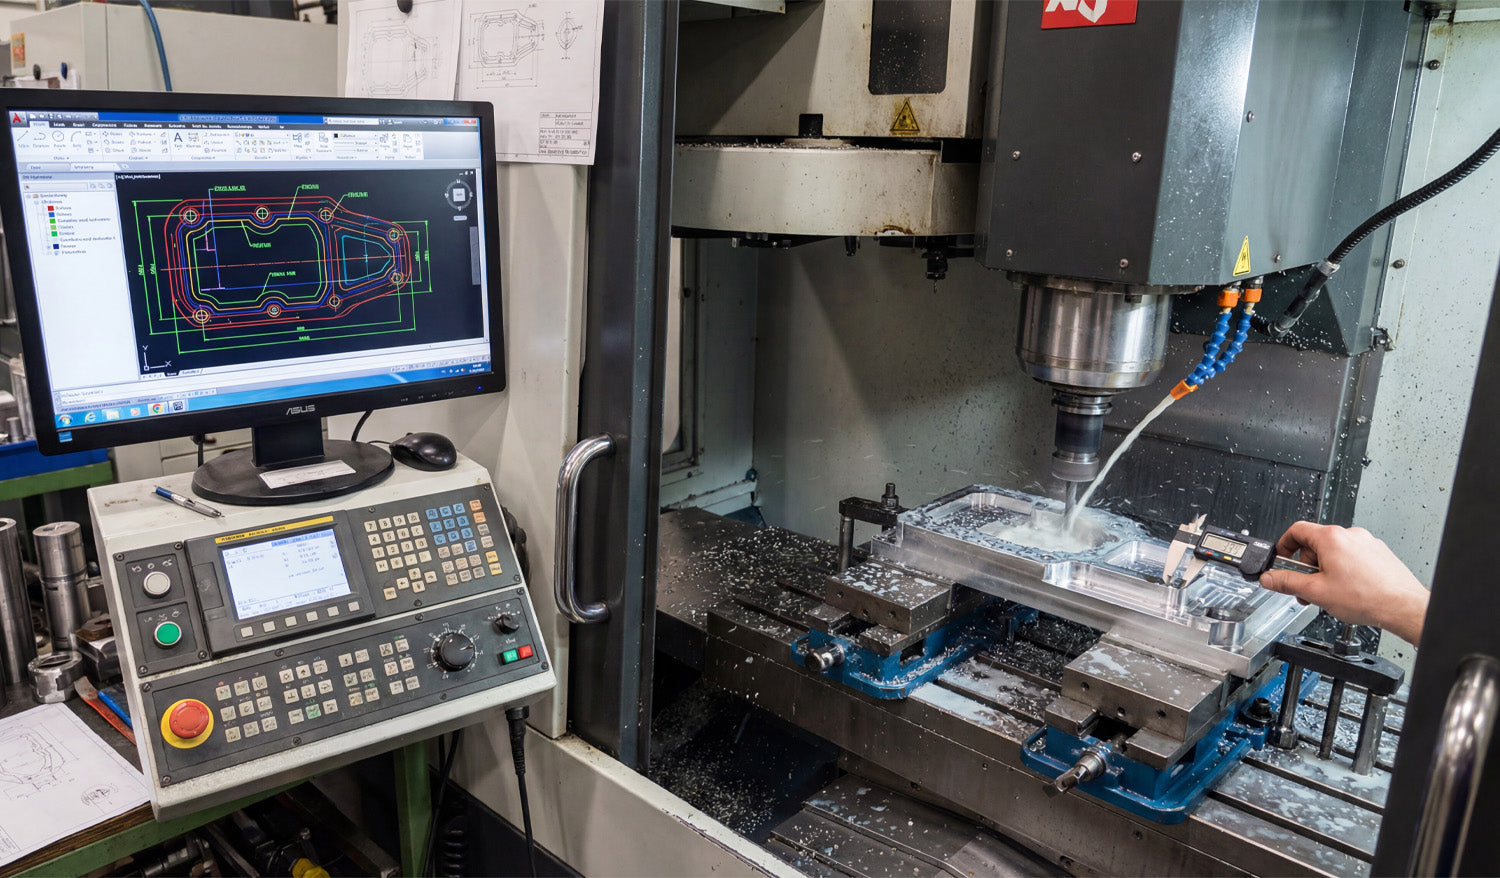
CNC milling is more than simple outlines. Real projects often include:
- Multiple pockets at different depths.
- Step faces and 2.5D contours.
- Bolt patterns, slots, and precision holes.
- Parts that require multi-side machining (top, bottom, and edges).
DXF (Drawing Exchange Format) files are ideal for describing the 2D geometry behind those features—profiles, boundaries, and reference curves that your CAM system uses to drive roughing and finishing toolpaths.
DXF vs 3D Models in CNC Milling
Many complex milling projects use both 3D models and DXF files together.
- 3D models (STEP, IGES, etc.): Define full solid shapes and surfaces for complex 3D machining.
- DXF files: Define precise 2D outlines, pockets, and hole patterns for profiling and 2.5D operations.
Even if you work from a full 3D model, exporting critical views as DXF—for example, the top profile or bolt circle—can make it easier to create and control specific milling operations in CAM.
Planning Complex Milling Projects with DXF Geometry
Before you start drawing or importing DXF files, think through the overall milling strategy.
- Setup plan: How many setups will you need (top only, top and bottom, or multiple sides)?
- Zero and origin: Where will your work coordinate system (WCS) be? Corner, center, or a feature?
- Feature groups: Which features are roughing only, which are precision, and which can be cut in a single operation?
- Tools and holders: What tool diameters and lengths will be used for each area?
Once you have a plan, you can build or clean DXF geometry that directly supports that strategy instead of fighting against it.
Creating DXF Files for Profiles and Pockets
In complex CNC milling, DXF files are especially useful for defining:
- Outer profiles: The final outside shape of the part as viewed from the top.
- Inner pockets: Closed contours that mark where material should be removed to a certain depth.
- Bosses and islands: Areas that should stay at a higher level inside a pocket.
- Slots and keyways: Long, narrow cutouts used for mechanical function.
Each of these can be drawn or exported as clean, closed 2D loops that your CAM software recognizes as milling regions.
Layering DXF Geometry for Complex Operations
Using layers in your DXF file makes it much easier to handle multiple depths, tools, and strategies.
- Place outer profiles on one layer (for example, PROFILE_OUTSIDE).
- Place pockets at depth 1 on another layer (for example, POCKET_Z-5).
- Place deeper pockets or step faces on separate layers (for example, POCKET_Z-10).
- Place drill holes and bolt circles on a HOLES layer.
- Use a REFERENCE layer for centerlines, datums, and construction geometry that should not be cut.
When you import the DXF into CAM, you can map each layer to a different operation and depth, which speeds up programming and reduces mistakes.
Designing DXF Geometry with Tool Diameter and Corner Radii in Mind
CNC milling tools are round, so your DXF design must respect tool diameter and minimum radius limits.
- Inside corners: Use fillets with a radius at least equal to (and often slightly larger than) the smallest tool radius you plan to use.
- Slots and pockets: Make sure the width is comfortably larger than your tool diameter so the cutter has room to clear chips.
- Sharp transitions: For precision fits, consider adding small relief pockets or “breakout” radii where mating parts need clearance.
Drawing these features correctly in DXF reduces the need to “cheat” toolpaths in CAM and helps you hold tolerances more easily.
Using DXF for Multi-Setup and Multi-Side Milling
Complex milling jobs often require machining from more than one side. DXF files can help you manage this.
- Top view DXF: Defines top profiles, pockets, and drilling layouts.
- Bottom view DXF: Represents flip-side operations, such as back-side pockets and relief cuts.
- Side view DXFs: For parts that need machining on the sides, simple 2D side profiles can guide slotting or step cuts.
By developing a set of DXF views tied to your setup plan and workholding, you can keep each operation clear and reduce alignment errors between sides.
DXF-Based Hole Patterns and Bolt Circles
Complex CNC milling projects often include many holes and bolt patterns that must align perfectly with other parts.
- Use DXF to define exact hole locations based on true dimensions and references.
- Draw bolt circles with centerlines and a reference diameter so your CAM software can apply drilling or circular pocketing easily.
- Keep hole types (clearance, tap, dowel) organized on separate layers if they require different tools or cycles.
Clear hole geometry in DXF allows CAM to generate drilling, reaming, and countersink operations quickly and consistently.
Preparing DXF Files for Rest Machining and Finishing Passes
On complex parts, you may rough with a larger tool and finish with a smaller one. DXF boundaries can drive these steps.
- Define rest machining regions as DXF contours where the larger tool cannot reach (tight corners and small pockets).
- Use separate layers for finishing boundaries so CAM can apply light, precise finishing passes only where needed.
- For critical surfaces, create offset boundaries that represent specific finish zones or tolerance areas.
This gives you fine control over where extra machining effort is spent, improving both surface finish and cycle time on complex parts.
Ensuring DXF Precision: Tolerances and Scaling
For complex milling, dimensional accuracy is critical. Your DXF must reflect true sizes and tolerances.
- Work in the correct units (mm or inches) and double-check overall dimensions.
- Use precise dimensions in CAD and avoid rounding key features without a reason.
- Include reference dimensions or a known-length line (for example, exactly 100 mm) to verify scale inside CAM.
- Document any intentional offsets (for press fits, sliding fits, or adhesive space) so CAM programmers know why the DXF differs from nominal print values.
A clean, accurately scaled DXF reduces guesswork and helps you hit target tolerances on the real part.
Common DXF Mistakes in Complex CNC Milling
Even advanced users run into issues when preparing DXF files for complex projects. Watch out for:
- Open contours: Profiles or pockets that are not fully closed, confusing CAM’s pocketing and profiling algorithms.
- Duplicate lines: Overlapping geometry that causes extra passes and poor surface finish.
- Unclear layer names: Layers called “Layer1” or “default” that do not explain their purpose.
- Ignoring tool access: Tight features that a real tool and holder cannot reach without collision.
- No datum references: DXFs that lack clear origin points or datums for aligning multi-setup operations.
Building a Reusable DXF Library for Complex Milling
Over time, your best DXF files become building blocks for future projects.
- Save proven pocket shapes, joints, bolt circles, and fixtures as reusable DXF components.
- Organize them by category—structural, decorative, fixture, etc.—for quick access.
- Document recommended tools and feeds/speeds that pair well with each standard feature.
- Reuse and adapt existing DXF geometry for new projects instead of starting from zero.
This approach speeds up CAM programming, improves consistency between jobs, and helps new team members follow established milling practices.
Conclusion
Using DXF files for complex CNC milling projects is a powerful way to control profiles, pockets, hole patterns, and multi-setup operations with precision. By designing clean, layered 2D geometry that respects tool diameter, corner radii, and real-world tolerances, you give your CAM software a strong foundation for efficient toolpaths. Over time, a well-organized DXF library becomes a key asset—helping you program faster, hold tighter tolerances, and deliver complex milled parts with confidence and repeatability.


