CNC & DXF Design Guides
CNC & DXF Design Guides

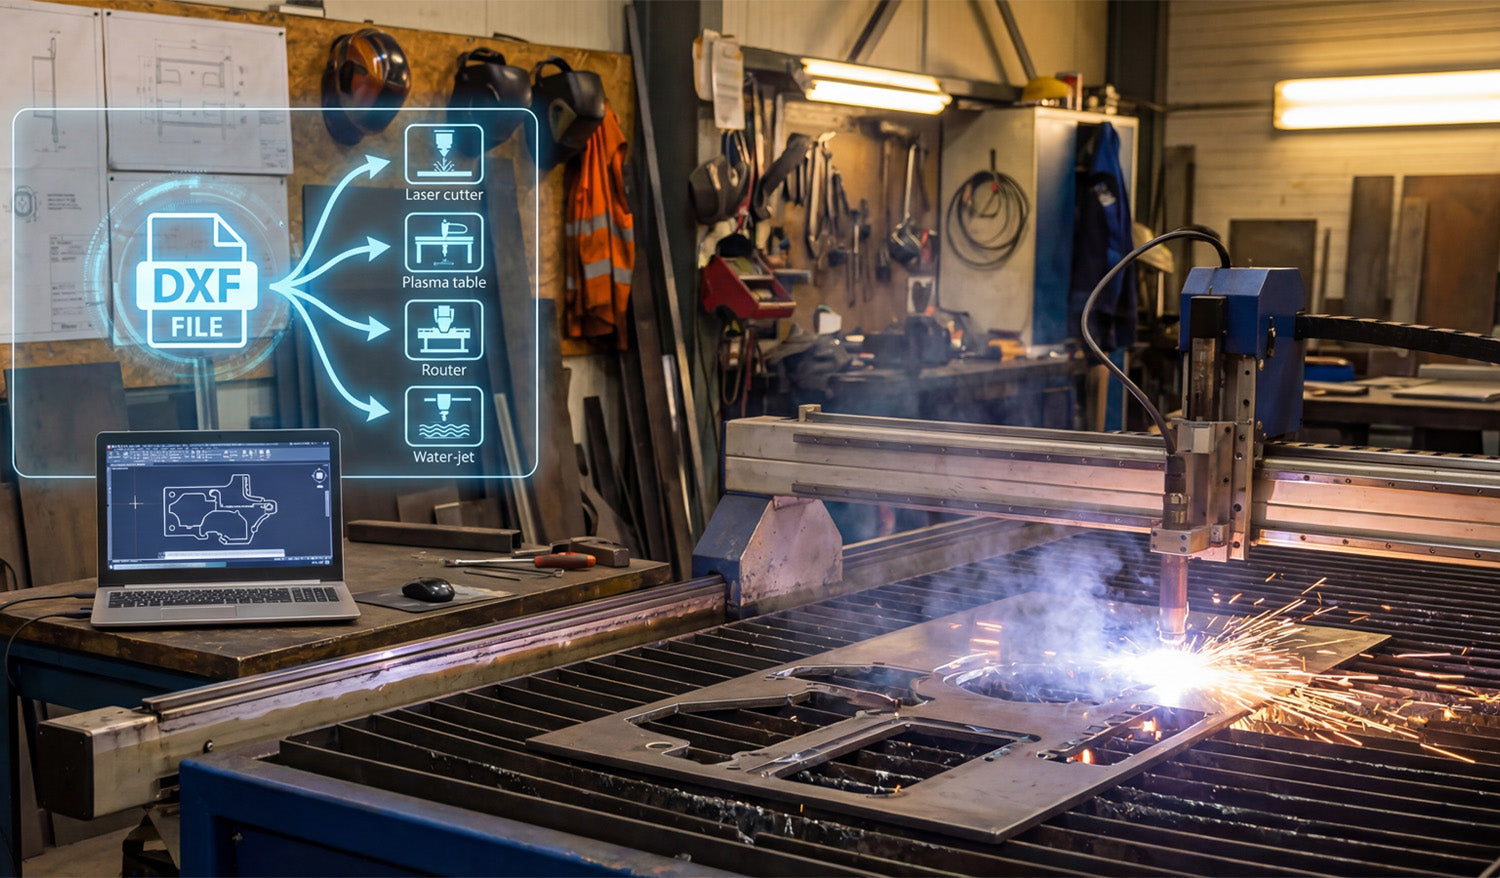
What Makes DXF Files the Standard for CNC Cutting?
DXF files became the standard language for CNC cutting because they are simple, open, and work with almost every CAD, CAM, and machine controller. What Is a DXF File? DXF stands for Drawing Exchange Format. It was created as a neutral way for different CAD programs to share 2D drawings. Instead of being locked to one brand or one piece of software, a DXF file can be read by hundreds of programs across Windows, macOS, and Linux. For CNC users, that means you can design in your favorite CAD tool, export as DXF, and then move the file into almost any CAM or control software that drives your laser, plasma, router, or water-jet table. A Short History of DXF in CNC As CNC machines became more common in metal shops, sign shops, and woodworking studios, manufacturers needed a file format that was easy to exchange. DXF spread quickly because: Most CAD software already supported it. Machine builders found it easy to parse and convert to G-code. Shops could send drawings to each other without worrying about which CAD program the other side used. Over time, “Can your machine import DXF?” became one of the first questions people asked before buying a CNC system. That is how DXF quietly became the default standard. Technical Reasons DXF Works So Well for CNC Cutting DXF is not magic, but it has several technical features that make it perfect for 2D cutting work. Vector based: DXF stores lines, arcs, circles, and polylines as precise math, not pixels. That is exactly what a CNC machine needs for clean toolpaths. Unit friendly: Drawings can be created in inches or millimeters, then scaled as needed during import. Layer support: You can separate cut, engrave, score, and reference geometry on different layers for easier CAM setup. Human readable: Many DXF versions are text based, which makes debugging or editing by script possible. 2D focused: Most CNC cutting work is flat—sheet metal, plywood, acrylic, and so on. DXF is optimized for exactly that. Why CNC Software Loves DXF From budget hobby software to industrial CAM packages, almost every CNC tool supports DXF import. That consistency gives you a few big advantages: Smoother workflow: You do not need to convert between random formats; you just export DXF and import it into your CAM. Less file drama: Shops, freelancers, and customers can share the same DXF without worrying which CAD system created it. Fewer geometry surprises: Because DXF is widely used and mature, most importers handle it very reliably. DXF vs Other File Formats for CNC Cutting There are many design formats out there, but DXF sits in a sweet spot for CNC cutting work. DXF vs DWG: DWG is powerful but heavily tied to specific CAD ecosystems. DXF is more open and better supported by third-party CNC tools. DXF vs SVG: SVG is common on the web and in graphic design, but it was not designed for machine tools. It can work for lasers, yet DXF usually imports with cleaner geometry and more predictable scaling. DXF vs AI/PDF: Illustrator and PDF files are great for print and branding, but they often need extra cleanup before CNC use. Converting them to DXF is a standard part of most CNC workflows. DXF vs STL: STL is a 3D mesh format used for 3D printing and milling. For 2D cutting, it is overkill and far less convenient than DXF. DXF vs G-code: G-code is machine-specific motion code, not a drawing format. Many shops create or receive DXF drawings and then generate G-code from them inside CAM software. How DXF Helps You Build a Reusable CNC Design Library Because DXF is so widely accepted, it is ideal for creating a long-term design library for your shop. You can cut the same design on different machines (laser today, plasma tomorrow) by re-toolpathing the same DXF. You can outsource cutting to another shop without sending proprietary CAD files. You can reuse and remix old designs easily, adding text, resizing, or combining elements for new products. Over time, a well-organized DXF library becomes one of the most valuable assets in a CNC business, letting you respond quickly to custom orders and repeat jobs. Best Practices When Working with DXF Files Even though DXF is the standard, a few habits will keep your files clean and machine-friendly: Keep shapes closed so inside and outside cuts are clear. Remove duplicate lines and tiny overlapping segments that can cause extra tool moves. Use layers to separate operations like cut, engrave, and reference. Test new designs on scrap material before running full production. Using Ready-Made DXF Files in Your CNC Shop You do not always have to draw everything from scratch. Many shops speed up their workflow by using cut-ready DXF libraries for metal wall art, panels, signs, and decor. As long as the license allows commercial use, you can focus on cutting, finishing, and selling products instead of spending hours on design work. If you are just starting or want to expand your library, you can experiment with free designs and later move to larger bundles when you know what sells best in your market. Conclusion DXF became the standard for CNC cutting because it combines simplicity, openness, and excellent compatibility. It gives designers, machine builders, and shop owners a common language that works across different tools, software, and workflows. Whether you run a small garage shop or a busy fabrication business, building your process around DXF files will keep your CNC projects flexible, portable, and future-proof.

Free DXF Files for CNC: What You Need to Know and How to Use Them
Free DXF files for CNC can save you time and money, but only if you know how to find safe files, read the license, and prepare them correctly for cutting. What Are Free DXF Files for CNC? DXF (Drawing Exchange Format) is one of the most common file types used to drive CNC machines. A free DXF file is simply a ready-made vector design that you can download without paying for the artwork itself. You can then import this file into your CAD or CAM software and generate toolpaths for a laser cutter, plasma table, router, or other CNC machine. For makers, small shops, and side businesses, free DXF files are an easy way to test a new machine, learn the workflow, or launch simple products without investing in custom design work. Where to Find Safe Free DXF Files Not every free download on the internet is safe or CNC friendly. Look for sources that clearly focus on CNC cutting and provide clean vector files. Specialized CNC libraries: Websites dedicated to CNC designs usually offer DXF files that are already tested for laser, plasma, or router cutting. Reputable creators: Choose designers and shops that show real cut examples, not just pretty mockups. Clear download structure: A good free DXF pack often includes multiple formats (DXF, SVG, AI, PDF, PNG) and a short readme or license text. If you want to start quickly, you can explore a curated collection of free designs here: Free DXF Files for CNC. What “Free” Really Means: Licensing Basics “Free” does not always mean “do anything you want.” Every DXF source should include a license that explains what is allowed and what is not. Personal use only: You can cut the design for yourself, but you cannot sell the final product. Commercial use allowed: You may sell physical products made from the design, but you cannot resell or share the digital files. Attribution or logo rules: Some licenses require giving credit to the designer or forbid removing their branding from previews. Before you upload a free DXF design to your shop or marketplace, always read the license page. For example, DXF Files for CNC provides a detailed license agreement that explains how you can legally use both free and paid designs. How to Download and Organize Free DXF Files As soon as you start collecting free DXF files, good organization will save you hours later. Create clear folders: Organize by category such as “Animals,” “Wall Panels,” “Monograms,” or “Signs.” Rename smartly: Use simple, descriptive names like wolf-metal-art-dxf instead of random download codes. Keep licenses together: Save each pack’s license or readme in the same folder as the designs. Backup your library: Store your DXF collection on an external drive or cloud service in case your main PC fails. How to Use Free DXF Files in Your CNC Workflow Once you have your files and license sorted, you can move them into your normal CNC pipeline. The exact steps depend on your software and machine, but the general workflow is similar. 1. Import the DXF File Open your CAD or CAM software and use the import function to bring in the DXF file. Make sure the units (millimeters or inches) match your project settings so the design is at the correct scale. 2. Clean Up and Check the Geometry Look for open paths that should be closed shapes. Remove duplicate lines that might cause the machine to cut the same path twice. Simplify extremely dense areas if your machine struggles with tiny segments. 3. Set Toolpaths and Cutting Order Assign operations such as inside cuts, outside cuts, and engraving. When possible, cut small inner details first and outer profiles last, so small parts do not move or tip before the job finishes. 4. Choose the Right Material and Settings Use cut settings that fit both your material and your machine: power, speed, pierce delay (for plasma), and number of passes (for lasers and routers). If you are using a design for the first time, work on scrap material to dial in a clean edge. 5. Run a Test Cut Even with a clean, free DXF file, every machine behaves differently. A small test cut helps you confirm that: The design is scaled correctly. The kerf width is acceptable for your detail level. Holes, slots, and text remain readable after cutting. Best Practices When Working with Free DXF Files Check before selling: Never list a product for sale until you have physically cut at least one sample. Avoid over-editing: If you heavily modify a free design, keep notes so you know which version you used and how it was changed. Standardize your settings: Once a design cuts perfectly, record the material and machine settings for fast repeat jobs. Respect the designer: Follow the license, do not resell the digital files, and avoid claiming the original artwork as your own. When to Move from Free DXF Files to Paid Libraries Free DXF files are perfect for learning, testing, and starting simple product lines. However, once your CNC work turns into a serious side hustle or full-time business, you may need: A larger, stylistically consistent library of designs. More unique artwork that competitors are not using. Commercial licensing that clearly covers high-volume sales. At that point, investing in a premium bundle can make sense. Instead of hunting for individual files, you get thousands of coordinated designs in one place, ready for CNC cutting. For example, you can upgrade from free starter files to a full library like the Full Access DXF Bundle for CNC Cutting and build entire product lines around it. Conclusion Free DXF files for CNC are a powerful way to experiment, practice, and even launch your first products with almost no upfront design cost. By choosing safe sources, understanding the license, organizing your library, and following a simple CNC workflow, you can turn those free vectors into real metal, wood, and acrylic products that your customers will love.

The Ultimate Guide to CNC Machines: How to Choose the Best One for Your Needs
Choosing your first CNC machine can be confusing. This guide explains the main CNC types, key specs, and a simple checklist so you can pick the right machine with confidence. What Is a CNC Machine? CNC (Computer Numerical Control) machines are automated tools that follow digital instructions instead of manual hand-work. You load a design file (often a DXF), set your cutting parameters, and the machine handles the rest: moving the tool in X, Y and sometimes Z to cut, engrave, or carve your material. For makers, metal shops, sign businesses, furniture brands and many others, a CNC machine is the bridge between digital design and physical product. The Main Types of CNC Machines 1. CNC Router Best for: Wood, MDF, plywood, plastics, soft aluminum, foams Typical uses: Signs, wall art, furniture parts, 3D carving, molds Pros: Large work area, versatile, great for sheet goods Cons: Not ideal for thick steel or very hard metals 2. CNC Laser Cutter / Engraver Best for: Thin wood, MDF, acrylic, leather, paper, some metals (with correct power and setup) Typical uses: Detailed wall art, signage, inlays, engraving logos or text Pros: Extremely precise, sharp details, very fast on thin materials Cons: Limited thickness; reflective metals can be tricky without a fiber laser 3. CNC Plasma Cutter Best for: Mild steel, stainless steel, aluminum plates Typical uses: Metal wall art, brackets, signs, industrial parts Pros: Cuts thick metal quickly, affordable compared to lasers Cons: Wider kerf and rougher edge quality than laser; not for wood or plastics 4. CNC Waterjet Best for: Almost any material – metal, stone, glass, composites Pros: Very clean cut, no heat-affected zone Cons: Expensive to buy and run; usually overkill for small workshops 5. CNC Mill / Machining Center Best for: Precision metal parts, molds, mechanical components Pros: Very accurate, can do complex 3D metal machining Cons: Higher learning curve, more expensive, usually smaller work area Step 1: Define Your Main Use Case Ask yourself a few simple questions before you buy anything. What will I cut 80% of the time? Mostly wood and MDF: Choose a CNC router. Metal wall art and brackets: Choose a CNC plasma (or fiber laser if budget allows). Thin wood/acrylic signs and decor: Choose a CO₂ laser. What level of use do I expect? Hobby level: Desktop or entry-level machine. Serious side-business: Mid-range, reliable brand with a bigger table. Full production shop: Industrial build, strong support, and automation options. Being honest about your main use case will prevent you from overspending on features you never use. Step 2: Choose the Right Work Area Size The bed size is one of the most important decisions. For sheet goods (wood, MDF, metal), common sizes are 4×4 ft or 4×8 ft. For small signs or crafts, a 2×2 ft or desktop machine may be enough. Always think about future projects: most people regret buying too small rather than too big. Remember: a bigger table needs more shop space, stronger dust extraction or fume control, and sometimes a larger power line. Step 3: Understand Power, Speed, and Rigidity Power Router spindles, laser wattage, and plasma amps decide what you can cut and how fast. Higher power usually means faster cuts and thicker materials, but also a higher price. Speed Rapid moves and cutting feed rates affect your productivity. For business use, saving even a few minutes on each job adds up over hundreds of parts. Rigidity A solid frame and gantry give you clean edges, no chatter, and consistent accuracy. Cheap, flimsy machines may look good on paper but will fight against you in real production. Step 4: Check Software and DXF Compatibility Since your shop may already rely on DXF designs, software compatibility is critical. Look for: Native DXF support: Your CAM or control software should import DXF files reliably. Simple workflow: Import DXF → set toolpaths → send to machine. Good post-processor options: So your G-code matches your controller (Mach3, LinuxCNC, proprietary systems, etc.). Before you buy, ask the vendor: “Can I test one of my DXF files on your software or controller demo?” If they say yes, try a real design—ideally one from your own DXF library—and see if the workflow feels smooth. Step 5: Consider Support, Training, and Spare Parts A CNC machine is not just hardware; it is an ecosystem. Support: Do they offer email, phone, or remote support? How fast do they respond? Training: Good tutorials and onboarding can save you weeks of frustration. Spare parts: Are consumables and replacement parts easy to buy in your country? For a business, reliable support is often more important than saving a few hundred dollars on the initial price. Step 6: Budget and Total Cost of Ownership When calculating your real budget, include more than just the machine price. Machine price Shipping, taxes, and customs Dust collection or fume extraction Air compressor (for plasma or some tools) Electrical work (new breakers and outlets) Software licenses or subscriptions Clamps, fixtures, tooling, and spare consumables A slightly more expensive, reliable machine with good support usually beats a cheap, unreliable one that stops your production. Quick CNC Machine Selection Checklist Use this simple checklist before you click “buy”: Main material: wood, metal, or mixed? Primary machine type: router, laser, plasma, waterjet, or mill? Minimum bed size: big enough for current projects and future growth? Power level: thickest material and speed you realistically need? DXF workflow: can your software import and toolpath DXF files quickly? Shop requirements: space, power, ventilation, and noise control? Vendor: reputation, reviews, support quality, and spare parts availability? Real budget: did you include all extras, not just the machine? If you can answer all eight clearly, you are very close to choosing the right CNC. How DXF Libraries Supercharge Your New CNC Once you have the right CNC machine, the next step is feeding it with clean, cut-ready DXF designs. Ready-made DXF files let you start earning from your machine on day one. You save hours of drawing time and jump straight into cutting metal wall art, signs, panels, and decor. A consistent DXF library also helps you test and benchmark your new machine quickly. On DXF Files for CNC, you can: Download free starter DXF designs to test your machine settings. Invest in larger DXF bundles for serious production and grow your product line fast.

How to Optimize Your DXF Files for CNC Cutting: Tips and Best Practices
Learn how to optimize your DXF files for CNC cutting with these essential tips and best practices. Improve precision and efficiency in your CNC projects. Introduction to DXF Files in CNC Cutting DXF (Drawing Exchange Format) files are the cornerstone of CNC (Computer Numerical Control) cutting. Whether you are using a laser cutter, plasma cutter, or CNC router, optimizing your DXF files is crucial for achieving precise cuts and ensuring that your projects run smoothly. In this article, we will explore the best practices for optimizing your DXF files for CNC cutting, helping you avoid common mistakes and improve both the quality and efficiency of your CNC projects. Why Optimizing Your DXF Files Is Important for CNC Cutting Optimizing your DXF files is essential for several reasons: Increased accuracy: Well-optimized DXF files help your CNC machine follow the correct paths, minimizing the risk of errors and misalignments. Faster processing: Streamlined files require less processing power and time to load, improving the overall efficiency of your CNC cutting process. Reduced material waste: Optimized DXF files ensure that the CNC machine cuts with precision, reducing unnecessary waste of materials. Tips for Optimizing Your DXF Files for CNC Cutting 1. Simplify Complex Designs Complex designs with unnecessary details can slow down the CNC machine's processing time and affect the cutting accuracy. To optimize your DXF files: Remove unnecessary layers: Delete any unused or hidden layers that might be included in your design file. Consolidate similar lines: Combine lines and arcs where possible to simplify the design. Use simple geometries: Avoid overly complex curves and opt for simpler shapes whenever possible. 2. Check for Closed Paths One of the most common issues in DXF files for CNC cutting is open paths. When a path is not closed, the CNC machine might not cut correctly or might leave gaps in the design. To avoid this: Ensure all your paths are closed (the starting and ending points of the path should meet). Use software like AutoCAD or Fusion 360 to visually check and fix open paths in your DXF files. 3. Use Appropriate Line Thickness The line thickness in your DXF file can impact the final output of your CNC cutting. For precise cutting: Set your lines to the correct thickness for your CNC machine. In most cases, CNC machines use vector lines, and line thicknesses are typically set to 0.001 mm for most designs. 4. Scale Your Design Properly Ensuring your design is scaled correctly in the DXF file is critical for CNC cutting. A design that is not scaled to the right dimensions can result in parts that do not fit together as intended. Double-check the scale in your DXF file before exporting it. Use the scale tool in your design software to confirm the exact dimensions. 5. Avoid Using Duplicated Objects Sometimes, duplicating objects in the design (for example outlines or components) may inadvertently occur when working with DXF files. These duplicated objects can result in unnecessary cuts and extra time on the machine. Use the “remove duplicates” tool in your design software to clean up your DXF file before exporting it for CNC cutting. 6. Convert Text to Paths Text in DXF files can sometimes cause issues with CNC cutting, as the machine may not properly interpret the text. To avoid this: Convert any text to paths or outlines before exporting the file. This ensures the CNC machine cuts the text exactly as you designed it. 7. Use Layers Effectively DXF files support multiple layers, which can be helpful for organizing different elements of your design (for example cutting, engraving, or scoring). To optimize your use of layers: Organize your design by assigning different operations to different layers. For example, one layer for cutting paths, one for engraving, and one for scoring. Make sure each layer is properly defined and that there are no overlapping elements between layers. 8. Optimize for the CNC Machine Type Different CNC machines (plasma cutters, laser cutters, routers, and others) may have specific requirements for the DXF files they process. To ensure compatibility: Check your CNC machine’s manual for any specific guidelines regarding DXF files. Adjust settings such as line types and units of measurement according to the machine's specifications. 9. Test Your Files Before running a full production run, it is always a good idea to test your DXF file on a scrap piece of material. This will allow you to catch any potential issues before they result in wasted materials or time. Common Issues and How to Fix Them Problem: The machine cuts the wrong path.Solution: Check for hidden objects or duplicate paths in the file. Problem: The machine cuts too slowly.Solution: Simplify the design by removing unnecessary nodes or reducing the number of details. Problem: Material wastage during cutting.Solution: Reassess your design layout to ensure the paths are optimized to fit efficiently within the material. Conclusion Optimizing your DXF files is an essential step in ensuring a smooth CNC cutting process. By following the tips and best practices outlined in this guide, you can minimize errors, reduce waste, and improve the overall efficiency and precision of your CNC projects. With the right optimizations, your CNC machine will operate at peak performance, delivering high-quality results every time. Ready to Start Optimizing Your DXF Files? If you are ready to dive into the world of CNC cutting and need high-quality DXF files for your projects, be sure to check out our collection of Free DXF Files or explore our Full Access Bundle for comprehensive design collections.
What Is a DXF File? The Universal CNC Language
DXF files are the universal language of CNC machines. In this guide, you will learn why DXF matters, how it became the standard, the key benefits for makers and fabrication shops, how a DXF turns into a cut path, which tools to use for editing and conversion, a simple first project workflow, a quick troubleshooting checklist, and where to find ready-made DXF resources on DXF Files for CNC. 1. Why You Should Care About DXF Picture this: You have designed a stunning wall-art panel, but when you load the artwork into your CNC plasma table the cut path looks like spaghetti. Nine times out of ten the culprit is a bad file format. DXF (Drawing eXchange Format) is the industry’s “lingua franca” — the safest way to move design data from your computer to the shop floor with zero guesswork. Learning to use it means less scrap, faster turnaround, and cleaner cuts. Quick takeaway: Mastering DXF is the single fastest productivity win for any CNC hobbyist or fabrication shop. 2. A 60-Second History Lesson 1982: Autodesk releases DXF alongside AutoCAD so different CAD systems can speak to each other. 1990s: CNC manufacturers adopt DXF import to bypass hand-coding G-code. Today: Virtually every laser, plasma, router, or water-jet table can open a DXF right out of the box — and most CAM packages default to it. 3. Why DXF Still Reigns Supreme Benefit What It Means for You Platform-agnostic Open it in AutoCAD, Fusion 360, DraftSight — whatever you like. Lossless scaling Vector math keeps edges razor-sharp from 1-inch jewelry to 10-foot signs. Lean file size Email projects without blowing up your client’s inbox. Editable layers Toggle text or drill points on or off without redrawing the entire file. Community support Thousands of free or premium DXFs are shared daily across maker forums. 4. Under the Hood — How a DXF Becomes a Cut Path Entities: Lines, arcs, circles, and polylines are stored with exact X/Y/Z coordinates. Header: Global data such as units, layer names, and drawing extents. CAM import: Your software converts those vectors into tool moves (G-code or proprietary code). CNC execution: The machine follows the path, fires the torch or spindle, and the magic happens. 5. Opening, Editing, and Converting Like a Pro Task Best-in-Class Tools Pro Tip View and measure FreeCAD, Autodesk Viewer (web) Perfect for quick client approvals. Heavy editing AutoCAD, Fusion 360, DraftSight Use distinct colors per layer to avoid accidental deletions. Bitmap → DXF Inkscape (Trace Bitmap) After tracing, run “Simplify” to remove excess nodes — your torch will thank you. 6. Step-by-Step: Your First DXF-Powered Project Grab a design: Download a free starter pack from our homepage: DXFFilesForCNC.com. Import into CAM: Use File → Import → .dxf in your CAM software. Configure material and tool: Example: 11-ga mild steel, 45 A nozzle, 110 ipm feed. Simulate: Check pierce order; lead-ins should stay off finished edges. Cut: Keep air pressure stable and watch for dross — adjust settings if needed. Post-finish: Give it a light flap-disk pass, then powder-coat for a showroom-ready look. 7. Troubleshooting Cheat-Sheet Broken paths? Combine open polylines with PEDIT → Join (AutoCAD) or Combine (Inkscape). Wrong scale? Verify inch ↔ millimeter settings during import. Burn-back on corners? Decrease feed slightly or add corner ramps in CAM. 8. Resources Exclusively from DXF Files for CNC 📥 Free design bundle: Ten crowd-favorite wall-art DXFs — download instantly from our Free DXF Files collection. 📚 Blog library: Deep dives on feed-rate math, metal-finish hacks, and more in our CNC and DXF guides. 🤝 Need help? Our team answers every question within 24 hours — contact us here. 9. Ready to Speak CNC Like a Native? DXF files are not just another format — they are the Rosetta Stone between your creative mind and a spinning, sparking, precision-cutting robot. Explore our ever-growing DXF catalog today, fire up that machine, and turn pixels into profit.

